Good Evening
As promised this is the tutorial for the project below, however it is slightly different as I did not want to make an exact replica. There is a lot of cutting out involved so I've divided the tutorial into two parts. To make this project you will need the following:
Scrap cardstock any colour
black cardstock
A small piece of embossed cream or ivory cardstock
2 pieces of sturdy white cardstock for the base
decorative paper
A clear medium some as Mod Podge, clear varnish or PVA glue.
A gold ink pad or some gilt cream
some scraps of coloured felt and a few beads
Some black acrylic paint or black gesso
1 Using scrap card cut but do not emboss the following:
7 of the cuckoo clock
4 each of the 3 birds
5 each of all the smaller pieces
Cut and emboss 1 of the upper half of the cuckoo clock using your patterned paper.
Cut and emboss 1 of all the other pieces and the lower half of the cuckoo clock using good black cardstock.
With the pieces in the dies, add some gold ink or gilt cream to your layer cut in good cardstock. This layer is the top layer and is added separately after all the other layers are stacked together and painted.
Using PVA clear drying glue or Mod Podge line your scrap pieces carefully and adhere them together one by one. Make sure each piece is glued down securely before you add the next layer. Press the layers firmly together.
When your layers are all firmly stuck together this is what you should have.
Now add a coat of black paint to your pieces.
When your pieces are dry, using cosmic shimmer PVA glue, add your top layers to your 3d pieces and add the smaller pieces to the clock as I have done with the finished clock in the picture. If you look at the birds you will see I have not yet adhered the top layer to the 3d birds.
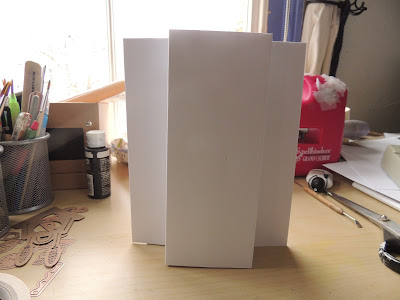
Now take the 2 pieces of A4 white cardstock and score both at 2 5/8 inch, 4 1/8 inch, 7 3/8 inch and 9 inches across the card. Fold as in the picture and stick the two together with double sided tape.
Take a piece of sturdy cardstock just less than A5 size and stick this to the back of the base
Your base will now stand securely
The last step in this first half of the tutorial involves a lot of cutting again. You need to cut the following:
8 lattice borders and
emboss 4 of these only
2 of the large lattice motifs and
emboss 1 of these only
2 each of the smaller motifs in the picture and
emboss 1 each only
Cut 1 of the 2nd largest Grand Decorative Ovals in white cardstock
Cut and emboss 1 of the 2nd largest Grand Decorative Ovals in patterned paper
Cut and emboss 1 of the 3rd largest of the Grand Decorative Ovals
Cut and emboss the 4th largest of the Grand Ovals in a fancy, cream or ivory cardstock
Cut some foliage as desired and colourize if you wish.
Part 2 of the tutorial will follow tomorrow.
Hope you enjoy the rest of your evening
Lol Lilygee xx


3 comments:
wow Thanks for this. It is a great tutorial with a lovely project. Look forward to part two. X
wow Thanks for this. It is a great tutorial with a lovely project. Look forward to part two. X
wow Thanks for this. It is a great tutorial with a lovely project. Look forward to part two. X
Post a Comment