Good Evening,
Here is the tutorial for the hanging bauble featured in my
recent DT project for Creative Expressions.
This is a modified version, to make it more manageable, but if you
follow the tutorial, and want to copy the DT project you will be able to do so
after seeing the tutorial. The bauble is shown below.
To see what you need, take a look at the original project. All changes, additional products etc will be mentioned as we go along.
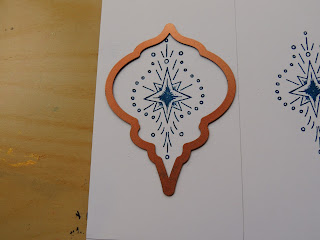
1 Using the Heartfelt Creations Stamp Set, choose the large stamp you would like to work with, and stamp the image 18 times. Divide your page and make sure there is enough space between the stamped images to accommodate the die comfortably, (in this instance, I'm using the second largest ornament from Spellbinders Heirloom Ornaments). I did not emboss the images in order to cut down on the work but if you wish, do so. I used Versafine Majestic Blue for a good, defined image.
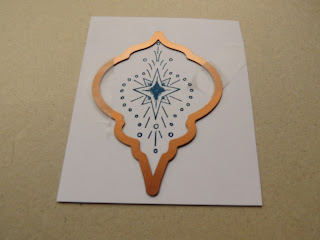
2 Line the die up to the stamped image as shown.
3 Cut the image with your Grand Calibur or other machine; there is no need to emboss the image. Cut all 18 ornaments in the same way.
4 After cutting your stamped images, cut 6 plain unstamped ornaments also, as you see in the picture. Then carefully put the stamped images, one by one, back in the die and ink the edges with Adirondack Stonewashed as shown. Do not ink the unstamped dies.
5 Score and fold all the stamped images as shown. Do not score or fold the plain unstamped die cuts.
6 Put 2 of the ornaments back to back as shown here and stick one side down with Cosmic Shimmer PVA glue.
7 Add one more ornament to the previous two in the order as shown on the left here and glue so that the ornament looks as above right.
8 Glue your 3d ornament to one of the plain unstamped dies so that it now has a flat back as shown here. Do the same with all the other stamped pieces until you have 6 complete sections
9 Cut yourself a circle about 2 1/2 inches wide, (doesn't have to be scalloped, but that's what I had to hand) another one inch smaller circle and a couple of snowflakes from the Spellbinders sets shown below. Heat emboss the small circle and the flakes in white or another colour of your choice.
10 Place the large circle in front of you and arrange the sections over the circle until you are happy with the layout of your bauble.
11 Now pull the sections away from the centre of the circle and add a generous amout of PVA glue to the centre. Push the sections into the glue and arrange them. Because you are using wet glue you now have the chance to arrange and rearrange the sections until you are happy. Squeeze the sections together so that they more or less meet in the middle as shown below.
12 Now take your glue gun and squeeze to fill the central gap and hold the ornament more firmly from the front.
13 Add dimensionals to the centre to raise it so that when you add the flakes, the sides of the ornament are cleared and the flakes will not look squashed.
14 Cut a small circular shape by hand just to cover the foam pads and make it tidier, then add your embossed small circle using PVA glue and your flakes. I have added a pearly brad to mine and of course you can add whatever you like to the centre. You don't have to use the flakes; you could put a fancy pearl or any other small die you have.
Turn the ornament over and using your glue gun, put glue under the circle and between each section to hold the sections firmly in place. Glue a piece of folded ribbon to the back so that you can hang it as I have in the pictures shown.
That's all for now, hope you have a go at making one and if you're really keen, you could make two and stick them together so that your bauble is completely 3d. Enjoy the rest of your weekend and see you next time.
Love lilygee xx


10 comments:
One word WOW. This is so stunning, the colours and the way you have put this together is amazing. This project must have taken you ages to put together. Thankyou for doing this, i have learnt so much xxxx
Actually Gilly it didn't take that long - around an hour and a half if you don't get disturbed!
lilygee
Oh thats not too long...i will give it a try. Thanks xxxx
Fabulous ornament, I can't wait to try it as I have everything apart from the Justrite stamp, and I'm sure I can improvise. I'm sure my grandchildren would love to do this! Helen
This is so lovely and unusual! Can't wait to try it and hang them up everywhere! Thanks for showing us how you did it. Love Nese x
How pretty! That is so clever, love it and thanks for the share too. Kim
Ohhhwoooo, I love it!!! Thank you!!
Greetings Anja
What a beautiful make! Love the details and the colours are fab, sorry on catch up as have been poorly! Trace x
So sorry Trace - hope you feel better very soon -thinking of you
xx
These are just gorgeous , really great idea.x
Post a Comment